
Chocolate & Vanilla Polka Dot Cake
How-To Make a Polka Dot Cake. But I wanted to be more specific with it, and share the outside as well as the inside, because I think it turned out nicely. (And I have some solutions for the problems that I did have.)
 What You Need:
Chocolate Cake Recipe (Either scratch or cake mix works fine.)
Vanilla/White Cake Recipe (scratch or cake mix again, fine.)
Chocolate Buttercream Icing
Vanilla Buttercream Icing
Small Round Cutter (like these)
Decorating bags and a variety of round decorating tips (I used tips # 12, 10, 7, 5 & 3)
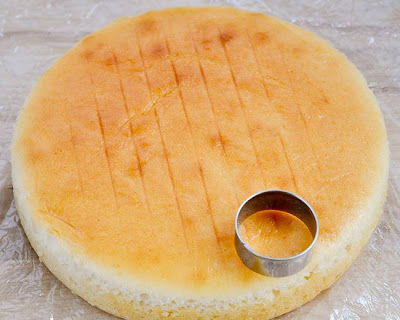 First, bake the white cake. I recommend using a cake that is a little more dense than fluffy. The challenge with really airy cakes is that the chocolate batter then seeps in, and it makes your circles a little less circular.
I chose to use only about 1 1/2 to 2 cups of batter in an 8" round pan so that the cake wouldn't be too tall. It's easier to cut if it's a little shorter.
When that has cooled, stick it in the freezer (wrapped in plastic wrap) for a few hours, just to make it a little easier to cut.
 Use the medium-sized round cutter from Wilton's Round Fondant Cutter Set to make the cylinders (dots).
Cut as many as you can get out of the cake.
 Then, prepare three 6-inch round pans with parchment paper lining the bottom, and baking spray around the sides.
Place the cylinders into the pan as you see in the photo above. You want to be sure that you place them so that when you're cutting the cake, you will see a circle, not a rectangle.

Chocolate Cake Recipe (Either scratch or cake mix works fine.)
Vanilla/White Cake Recipe (scratch or cake mix again, fine.)
Chocolate Buttercream Icing
Vanilla Buttercream Icing
Small Round Cutter (like these)
Decorating bags and a variety of round decorating tips (I used tips # 12, 10, 7, 5 & 3)

I chose to use only about 1 1/2 to 2 cups of batter in an 8" round pan so that the cake wouldn't be too tall. It's easier to cut if it's a little shorter.
When that has cooled, stick it in the freezer (wrapped in plastic wrap) for a few hours, just to make it a little easier to cut.

Cut as many as you can get out of the cake.

Place the cylinders into the pan as you see in the photo above. You want to be sure that you place them so that when you're cutting the cake, you will see a circle, not a rectangle.
How Not To Make a Polka Dot Cake post for more specific instructions on this.)
 Make the chocolate cake batter, and pour it over the cylinders as well as around the sides. You do want to be sure to get some batter on top. It tends to help the dots not rise as much with the batter. And I tried to focus on getting more along the outside edge than the center of the pan.
Bake the cakes immediately! One of the reasons my circles got so invaded with chocolate batter was that I was waiting for something else to finish baking, and I let them soak in the batter. Not smart.
 When the cakes have cooled, level them, using a cake leveler-- trying to keep as much of the polka dots in tact as possible.

Bake the cakes immediately! One of the reasons my circles got so invaded with chocolate batter was that I was waiting for something else to finish baking, and I let them soak in the batter. Not smart.

How to Ice/Frost a Cake for more information on how to do that well.)
 I used my various sizes of round tips to then add the dots to the outside.
 I started at the bottom of the sides and used Tip #12 to make large dots.
(Hold the bag straight out from the side of the cake, squeeze until the dot is as big as you want it to be. Stop squeezing before you pull away. If you get little points on the outside, like you see above... let the icing set for a little while, or stick it in the fridge, then you can use your finger to smash down all of the little points.)
Then, just use your smaller tips to make dots spaced between the previous rows of dots all the way up.
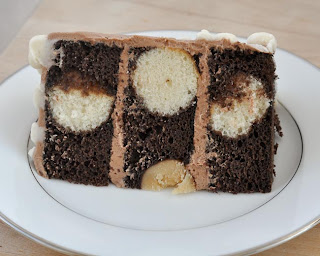 It's not perfect... but it's well on its way.
As I mentioned in my "How To" post, I used a cake ball in the center here. I don't recommend that. I would just plan to leave out the "dead center" dot.
Click the Links Below to See:
How (Not) To Make a Polka Dot Cake
Make Cake Mix Taste (almost) Homemade
Icing Recipes and Tips
And don't forget, if you shop at Amazon.com through my link , you support this blog and its contents. Thank you!
Read More


(Hold the bag straight out from the side of the cake, squeeze until the dot is as big as you want it to be. Stop squeezing before you pull away. If you get little points on the outside, like you see above... let the icing set for a little while, or stick it in the fridge, then you can use your finger to smash down all of the little points.)
Then, just use your smaller tips to make dots spaced between the previous rows of dots all the way up.

As I mentioned in my "How To" post, I used a cake ball in the center here. I don't recommend that. I would just plan to leave out the "dead center" dot.
Click the Links Below to See:
How (Not) To Make a Polka Dot Cake
Make Cake Mix Taste (almost) Homemade
Icing Recipes and Tips
And don't forget, if you shop at Amazon.com through my link
, you support this blog and its contents. Thank you!

How NOT To Make a Polka Dot Cake (and How-To)
Oh, Pinterest... you evil, evil website, you.
 I saw a cake like this polka dot one on Pinterest from a blog called Once Upon a Pedestal. It's beautiful, and an awesome idea.
However, she uses a cake pop pan to make the polka dots. I don't have one of those, and the last thing in the world that I need is another cake pan! So, I decided to try some other options.
It took me four cakes, and five days, but I finally got it! (Well, mostly.)
Cake Trial #1
The mini-cupcake pan
 I thought, oh, sure, I will just pop some multi-colored mini-cupcakes into the batter... they're round, it will be perfect.
Not. So. Much.
(Sorry I didn't take many pictures of this trial, I was sure it would work, so I was going to take the pictures "next time.")
 As you can see, they're not really round. They're more like round-ish. And I literally just sprinkled them in the pan all willy-nilly, so they don't even resemble round dots in many places.
Another problem was that the mini cupcakes didn't stay put when they cake started to bake and rise. I share a solution for that below in Cake #4.
Cake Trial #2
Traditional Cake Balls (Cake Pops) Baked Inside
 Okay, so I don't want to buy a pop pan. Well, I know how to make cake pops, why not just put those inside the cake?
Initially I resisted this idea because of texture differences. I know that cake and cake pops have entirely different textures, and I worried it would be weird.
 While the texture itself was, indeed, a problem, the bigger problem was that the cake balls were like rocks after they baked inside of the cake... you can kind of see in the photo how the center one was falling out of the cake. Not successful. (Although, it did taste good.)
Cake Trial #3
Cake cylinders cut from baked cake (combined with a quasi-cake ball center)
 This is much closer!
I used the middle-sized round cutter (1 1/2" diameter) from my set of Wilton Round Fondant Cutters. (You can buy these for less than $5 at JoAnn, Michaels, Hobby Lobby... and of course, online. And they're a lot easier to store than the cake pop pans!) My smallest biscuit cutter was 2" in diameter, so that was too big.
I baked an 8" round white cake, using just 2 cups of batter, so that it wouldn't be too tall. I wrapped it in plastic wrap and froze it for an hour, so that it would be easier to cut.
 I cut the "dots" out using the round cutter. The challenges here are that the cutter isn't very tall, so you have to be kind of creative with getting it out. AND it's so crumbly. (I'm wondering if a pound cake might not be a good idea in the future??)
I placed the dots in the pan (lined with parchment paper). Here's what you need to pay attention to... you need to be sure you lay the cylinders so that they will be round when you cut them.
 You don't want to put them in so that they look like circle to you from the top. If they do, then they will look like rectangles when you cut the cake.
 And if you put them in willy-nilly, you will have a cake that looks like Cake #1, with funny-shaped spots instead of nice, round dots.
 I thought that perhaps cutting the cylinders smaller would help make the dots better (like in the cake at the top of the photo above), but I found that it didn't. For one, it made them fall over easier. It also made them rise more with the cake batter while baking, and it made them absorb more of the chocolate batter, making the dots appear weird-shaped when baked.
What you want to do, is leave the cylinders bigger, and pour the batter around and on top of them. Pouring the batter on top helps the dots not rise as much when the cake bakes around them. (Go slowly and be gentle, though, while pouring, they are round, so they can roll all over.)
 My mistake with this cake was placing the "cake ball" in the center. I wanted the center spot to be round from all sides. But I knew from Cake #2 that actual cake balls would not work. So, I rolled just baked cake - no icing combined in it - into a ball. But as you can see, it turned into a different color, and the texture difference bothered me again.
In the end, this cake was almost a success. The white cake absorbed too much of the chocolate batter. (I let them sit too long before putting them in the oven.) And that cake ball in the middle makes me crazy.
Cake #4
Mini-Cupcakes cut-out with round cutter
 YES!
YES!
Okay, for this fourth, and final (for now) cake, I combined a few of my previous attempts to find success.
 I used the mini-cupcakes that I'd made for the ill-fated Cake #1, but I used my round cutter to make them actually round. (Again, I froze these to make cutting easier.)
*Note: To make the colored mini-cupcakes, I used the McCormick Neon Food Coloring set that you find at the grocery store, and added it to the batter. Then, I baked them in a mini-cupcake pan that had been sprayed with baking spray (not lined with papers.)
 When I arranged the cut-outs this time, I was very deliberate in how they were laid and spaced, as you can see above.
 I then used 2 1/4 cups of batter in each 8" cake pan, poured over and around the dots. (Carefully, so as not to knock them over.)
 When the cakes came out of the oven, they were rather lumpy, so I had to level them, before stacking, filling and icing them.
I only made two layers on this one. I think three should be the minimum. I plan to make yet another of these cakes very soon for a special project, so when I get that one finished-- it will be three layers-- I will add some photos of that.
*Note: I think that you cut the dots out of either a regular cake or out of the mini cupcakes, and achieve about the same results. I used the mini-cupcakes here because I had them leftover from attempt #1. I intend to use a baked cake next time, just because a cake pan is easier to clean than a mini-cupcake pan. However, cutting out the mini cupcakes is easier than cutting out the cake, so it's really a toss-up!
**Note also: I will be creating some simpler how-to posts on how to make the chocolate cake and how to make this final, successful cake. I know this post got long and a little information-heavy, but I wanted to show all of the mistakes I made to help keep you from making them yourself. Because, as a friend said to me when I said I was on attempt #4, "I would have given up after a second try." And I don't want you to give up!!
And don't forget, if you shop at Amazon.com through my link, you support this blog and its contents. Thank you!
Read More

However, she uses a cake pop pan to make the polka dots. I don't have one of those, and the last thing in the world that I need is another cake pan! So, I decided to try some other options.
It took me four cakes, and five days, but I finally got it! (Well, mostly.)
Cake Trial #1
The mini-cupcake pan

Not. So. Much.
(Sorry I didn't take many pictures of this trial, I was sure it would work, so I was going to take the pictures "next time.")

Another problem was that the mini cupcakes didn't stay put when they cake started to bake and rise. I share a solution for that below in Cake #4.
Cake Trial #2
Traditional Cake Balls (Cake Pops) Baked Inside

Initially I resisted this idea because of texture differences. I know that cake and cake pops have entirely different textures, and I worried it would be weird.

Cake Trial #3
Cake cylinders cut from baked cake (combined with a quasi-cake ball center)


Cake #4
Mini-Cupcakes cut-out with round cutter

Okay, for this fourth, and final (for now) cake, I combined a few of my previous attempts to find success.

*Note: To make the colored mini-cupcakes, I used the McCormick Neon Food Coloring set that you find at the grocery store, and added it to the batter. Then, I baked them in a mini-cupcake pan that had been sprayed with baking spray (not lined with papers.)


*Note: I think that you cut the dots out of either a regular cake or out of the mini cupcakes, and achieve about the same results. I used the mini-cupcakes here because I had them leftover from attempt #1. I intend to use a baked cake next time, just because a cake pan is easier to clean than a mini-cupcake pan. However, cutting out the mini cupcakes is easier than cutting out the cake, so it's really a toss-up!
**Note also: I will be creating some simpler how-to posts on how to make the chocolate cake and how to make this final, successful cake. I know this post got long and a little information-heavy, but I wanted to show all of the mistakes I made to help keep you from making them yourself. Because, as a friend said to me when I said I was on attempt #4, "I would have given up after a second try." And I don't want you to give up!!
And don't forget, if you shop at Amazon.com through my link
, you support this blog and its contents. Thank you!

Hearts-Inside Cake... Or Not
Polka Dot Cake...
 I decided that I wanted to try it with hearts for Valentine's Day. It seemed so simple... and really, the hearts-inside part actually turned out pretty well...
 It's just the rest of the execution that failed... miserably.
I'm hoping to give the hearts - or maybe another shape - another chance some time soon. But, if you want to try it yourself... and certainly get better results... let me tell you what worked, and what decidedly did NOT.


I'm hoping to give the hearts - or maybe another shape - another chance some time soon. But, if you want to try it yourself... and certainly get better results... let me tell you what worked, and what decidedly did NOT.
Strawberry Cake, and added some extra pink coloring to make it brighter inside of the chocolate. (I should have added even more, actually.)
I then used a small heart cutter to cut the cake into heart shapes. (Similar to how made the Polka Dot Cake.)
 All good, so far. Slap some chocolate batter on the top of the heart, before placing it into the pan, to make sure there was some batter in the dip of the heart.
 Cover them up, bake them. ... all good!
I then used a small heart cutter to cut the cake into heart shapes. (Similar to how made the Polka Dot Cake.)


Strawberry Icing that is awesome, I just added some pureed strawberries to regular buttercream icing.
Mistake #1:
The Decorators' Buttercream is a little different consistency than the Swiss Meringue Buttercream, so it just didn't work the way I'd planned. (And it didn't taste as good, either.)
Then, I didn't feel like going to the store to buy heavy cream to make the Ganache. That's okay, half-and-half is close enough, right?
Mistake #2:
The half-and-half ganache never set up. It stayed runny. After more than an hour in the fridge... runny.
 Then, being impatient as the ganache wouldn't set up, I decided it would be fine if I just spread a little, even if it was runny between the layer of icing, and the next layer of cake.
Mistake #3:
Slippery ganache on top of thick buttercream makes for an unstable middle of a cake.
 So, then I frosted the poor thing, as it swung and swayed like a building in a magnitude 5,000 earthquake. It was around this point that I began to suspect this cake wasn't going to end as I'd hoped... but I still didn't suspect the disaster that was upon me.
 I finally got a little of the non-ganache to stiffen up by overheating it in the microwave... and adding some more chocolate.
 But genius that I am, it didn't occur to me that roughly icing the sides of the cake would mean that when the ganache dripped down the sides, it would look awful. And it did!
It's okay, I told myself, the inside. The inside will be great. So, I started cutting... a few small pieces to try to find the best hearts.
 I still wasn't completely satisfied with the inside photos, so I decided, maybe if I cut it in half...
(This is where the scary music would play. duh-duh-duh!)
And she fell... the layers all slipped off one another, and landed in a massive pile, half upside down.
 The disappointment!
Click the Links Below to See:Other Baking Fails & Fixes
The Polka Dot Cake
A Better Chocolate-Covered-Strawberry Cake
And don't forget, if you shop at Amazon.com through my link, you support this blog and its contents. Thank you!
Read More
Mistake #1:
The Decorators' Buttercream is a little different consistency than the Swiss Meringue Buttercream, so it just didn't work the way I'd planned. (And it didn't taste as good, either.)
Then, I didn't feel like going to the store to buy heavy cream to make the Ganache. That's okay, half-and-half is close enough, right?
Mistake #2:
The half-and-half ganache never set up. It stayed runny. After more than an hour in the fridge... runny.

Mistake #3:
Slippery ganache on top of thick buttercream makes for an unstable middle of a cake.


(This is where the scary music would play. duh-duh-duh!)

Click the Links Below to See:Other Baking Fails & Fixes
The Polka Dot Cake
A Better Chocolate-Covered-Strawberry Cake
And don't forget, if you shop at Amazon.com through my link
, you support this blog and its contents. Thank you!

Farewell to 2013! {Giveaway} - WINNER!
2014 could be your lucky year! I'm starting it off with a little giveaway, and a quick review of my favorite recipes and ideas from the last year.


You can win this Wilton Tool Caddy to hold all of your decorating tools:
And to get your collection started, I'll throw in this 18-piece decorating set, as well:
Total giveaway value: approx. $58.
WINNER is #16: Jenny Sireno! Congratulations!
You have three chances to enter.
ALL ENTRIES MUST BE MADE IN SEPARATE COMMENTS ON THIS POST ONLY.
#1- Leave a comment telling me: What are you most looking forward to in 2014?
#2- Let me know that you get my emails, or "like" me on Facebook, or are a "follower" of the blog.
#3- Share or link to this post on Facebook, Twitter, Pinterest (or all three), and let me know that you did so.
The Info:
This giveaway will be open until 6:00 am (Central Time) Saturday, January 4, 2014.
I'm sorry, but it is only open to those U.S. Residents (because other countries have too many rules about giveaways) who are 18 years-old or older.
You must put your name (and email address) in your comments. I can't trace anonymous comments.
I will announce the winner - chosen by a 7-year-old pulling a number out of a hat - by noon the same day.
The Fine Print:
I bought these gifts myself, with my own money. No one gave me anything for this post.
Read More


(This cake also rocketed up to the most popular post ever on my site!)
Now, it's your turn!You can win this Wilton Tool Caddy to hold all of your decorating tools:
 |
| photo courtesy wilton.com |
 |
| photo courtesy wilton.com |
WINNER is #16: Jenny Sireno! Congratulations!
I bought these gifts myself, with my own money. No one gave me anything for this post.
Subscribe to:
Posts (Atom)