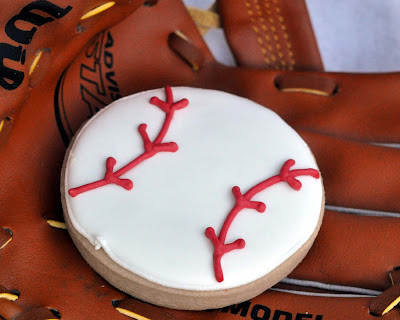
Play Ball! Baseball Cookies
I wondered the other day to those of you who follow my Facebook page... if I had two little girls... instead of two little boys... or even just one little girl, would this blog have a lot more pink, tutus and princesses?
Well, it doesn't really matter, I guess, because I have boys.
I have to tell you, in the realm of things to make... baseball cookies... pretty darn simple!
What You Need:
Vanilla Sugar Cookie Dough
Royal Icing
Large, round biscuit (or cookie) cutter
Red Coloring*
Piping Bag fit with Tip #2
*Note: See my post about How to Color Icing for some tips on making a dark red color. It can be a real pain!
These cookies really couldn't be more simple. Make your cookie dough, and cut it into large circles. (My favorite recipe for sugar cookies is here. These won't spread and get all funky-shaped.)
Bake them, and let them cool. (The big 3" circles took a little longer-- about 11-12 minutes to bake instead of my regular 8-10.)
I let the boys help me fill in the white icing - since they were treats for their baseball team, so I went ahead and outlined them with a Tip #2. If you're doing this without 5-year-old help, you could probably skip the outline if you're careful with your flood icing.
(Click the link to see my post about Getting the Right Royal Icing Consistency.)
I let the cookies dry overnight, then I made the outline for the stitching using the same cookie cutter.
*Two notes here:
- I tried free-handing the stitching, and it wasn't rounded enough, so the outline was very necessary for me.
- I didn't wait overnight for some of the cookies to dry before I tried to make the outline, and it resulted in a very frustrating crack in the icing. If you have the luxury of time, be patient. Wait until the cookie is dry before making your outline.
Add the stitching using a Tip #2 and red icing. I preferred the V-shaped stitching over the straight laces. But you can see here my various options for ideas.
To make the rounded stitching like on the cookie above, think of making a horseshoe-- with a waistline pulled in. (I like throwing a few of these in with the regular ones. I think they give the group of cookies some character.)
To give them to the baseball team, I bagged each one in a medium-sized treat bag and stapled the tops. If I were more dedicated, I would have made some cute little bag toppers, but with the week I've had, between almost breaking my hand with a camera, and a storm that knocked out power for the better part of a 90+ degree day, I think this is sufficient.
Play Ball!
Click the Links Below to See:
Baseball Cake Pops
Beach Ball Cookies
NCAA Basketball Bracket Cookies
And don't forget, if you shop at Amazon.com through my link , you support this blog and its contents. Thank you!
Well, it doesn't really matter, I guess, because I have boys.
I have to tell you, in the realm of things to make... baseball cookies... pretty darn simple!
What You Need:
Vanilla Sugar Cookie Dough
Royal Icing
Large, round biscuit (or cookie) cutter
Red Coloring*
Piping Bag fit with Tip #2
*Note: See my post about How to Color Icing for some tips on making a dark red color. It can be a real pain!
These cookies really couldn't be more simple. Make your cookie dough, and cut it into large circles. (My favorite recipe for sugar cookies is here. These won't spread and get all funky-shaped.)
Bake them, and let them cool. (The big 3" circles took a little longer-- about 11-12 minutes to bake instead of my regular 8-10.)
I let the boys help me fill in the white icing - since they were treats for their baseball team, so I went ahead and outlined them with a Tip #2. If you're doing this without 5-year-old help, you could probably skip the outline if you're careful with your flood icing.
(Click the link to see my post about Getting the Right Royal Icing Consistency.)
I let the cookies dry overnight, then I made the outline for the stitching using the same cookie cutter.
*Two notes here:
- I tried free-handing the stitching, and it wasn't rounded enough, so the outline was very necessary for me.
- I didn't wait overnight for some of the cookies to dry before I tried to make the outline, and it resulted in a very frustrating crack in the icing. If you have the luxury of time, be patient. Wait until the cookie is dry before making your outline.
Add the stitching using a Tip #2 and red icing. I preferred the V-shaped stitching over the straight laces. But you can see here my various options for ideas.
To make the rounded stitching like on the cookie above, think of making a horseshoe-- with a waistline pulled in. (I like throwing a few of these in with the regular ones. I think they give the group of cookies some character.)
To give them to the baseball team, I bagged each one in a medium-sized treat bag and stapled the tops. If I were more dedicated, I would have made some cute little bag toppers, but with the week I've had, between almost breaking my hand with a camera, and a storm that knocked out power for the better part of a 90+ degree day, I think this is sufficient.
Play Ball!
Click the Links Below to See:
Baseball Cake Pops
Beach Ball Cookies
NCAA Basketball Bracket Cookies
And don't forget, if you shop at Amazon.com through my link


0 Response to "Play Ball! Baseball Cookies"
Post a Comment