Showing posts with label Cookies. Show all posts
Back-to-School Pencil Cookies

Back-to-School Pencil Cookies

When my son saw these cookies, he asked if he could write with them. Probably not, but they are tasty!

What YouNeed:
One recipe Vanilla Sugar Cookies
Ruler
One recipe Royal Icing
Icing colors: yellow, pink, black
Tip #3
Piping Bags
Zip-top sandwich bags (or snack-size bags)
Silver Pearl Dust
Clear Vanilla Extract
Food-safe paintbrush
Plastic Wrap (for icing bag bullets)
Damp Paper Towel (to keep icing from drying out)


Make a batch of the Vanilla Sugar Cookies, and after you roll it out and refrigerate it, cut it into a square. I kept my lines straight by lining up the end of the ruler at the corners, to make a 90-degree angle.

To cut the cookies, I measured the dough to approximately 1 1/2" wide strips and cut it with a pastry cutter. A pizza cutter would also work, or a knife.
I then cut the dough in half horizontally. (Making each pencil about 4 1/2" long.)

Because I'm not good at eye-balling straight lines or angles, I measured down about 3/4" on each strip. I marked it with a knife.

Then, I marked in the top - where my point would be.

And I cut each side from mark to mark to make even points on my pencils. Do this for every pencil.

Remember that you want to put the tray of cut-outs into the freezer for 15 minutes before you put it in the oven to bake. That keeps the dough from spreading into a wonky shape.

Bake them for about 8-10 minutes in a 350-degree oven. They're done when the pencil tips start to brown.

To Decorate:

Begin by coloring your icing . I started with yellow, then the off-white for the tips, then pink, then black. This way you can use one bowl to do all of your coloring. You will need about 1/2 cup of yellow, and about 1/4 cup of white, off-white, pink and black.

You want to color the icing at the "stiffer" consistency, then take about half of it out, put it into an icing bag bullet (click the link to see the wonder of the bullet.). This is what you will make your outlines with. Then thin the other half of each color.
You won't need any white in a flooding consistency.

To thin the icing, add water about 1/2 to 1 tsp. at a time. Mix the water in until the icing is at a flooding consistency. You will know it's the right consistency when a dollop you drop in disappears in a slow count of 10.
In the photo above, you see the dollop in the middle. This is as I just dropped it in.

This photo shows that dollop when I got to 10. You can see a teeny outline on that right picture. That's all you should see at 10.  
If you add too much water, you'll need to either add some more of a stiffer consistency icing, or add a little powdered sugar.
Pour this icing into a zip-top sandwich bag. That's what I use to put it on the cookies.

When you get all of your icing ready, you'll start with the lines on the pencil. Make 2 or 3 straight lines across the pencil near the "eraser" end.

While that icing dries and sets, mix up your silver "paint." Add about 1/4 tsp. of clear vanilla extract and a sprinkle of silver pearl dust in a small prep bowl or cup.

When the white icing has hardened, lightly paint the silver on the lines. If you do not wait long enough, you will smear and smoosh the lines. Also, don't try to go over it too many times. Adding a liquid to the icing will make it wet again, so again, you'll smear and smoosh. (Just like an impatient me did in the photo above.)

After I paint, I add the other outlines, one color at a time.

Then, I fill the cookies with the flooding icing, one color at a time, from eraser to tip. Remember when you're using the flooding icing to keep the cut tip of the bag in the icing as it flows out. That will help keep any lines out of the icing -- in case your icing isn't quite thin enough.

You could leave them at this, if you wish...

Or you can add the lines that give the pencil a little dimension. Start at the top of the "curve," and end at the silver line.

You could even add names or messages on the pencils in black, if you wanted. I was too tired to do this, and I loved them plain.

Wrap some up for your favorite teacher-- or student.

Click the Links Below to See:
More Back-to-School and Teacher Ideas

Cookie Decorating Ideas & Recipes
Vanilla Sugar Cookie Recipe
Royal Icing Recipe

Enter your email address below to receive the latest recipes, tips and ideas in your email inbox:


Delivered by FeedBurner
Read More
Personalized Fall Cookies

Personalized Fall Cookies

My Dad called me a few weeks ago and asked if I could make him some special cookies for an "autumnal equinox party." (Yes, that's my Dad, he has parties for the autumnal equinox.) He said he wanted to send his guests home with personalized fall cookies.

They're really pretty simple, they just take a little extra time if you want to add the sprinkles to the outlines. I love the acorns the best.

What You Need:
Vanilla Sugar Cookie Recipe
Royal Icing Recipe
Sanding sugar sprinkles
Piping Bags with Tip #1 or #2
Paper Plates (for sprinkling)

*If you have never worked with Royal Icing before, I recommend checking out a few other of my cookie posts to give you an idea how to make it work. I didn't take as many photos of these cookies because I just needed to get them done and out the door.
(See here: Royal Icing Recipe- has a lot of how-tos and tricks. Beach Ball Cookies is another good one.)

To make the cookies that have just the accents sprinkled... you want to flood the cookie first, and allow it to dry. It can not be tacky to the touch at all. Mine probably dried 2-3 hours before I added the accents.
When the flood icing is dry, add the outline, accents or letters over the top.

To add the sprinkles, set the cookie on a large, flexible paper plate. Pour the sprinkles over the top of the cookie.

Gently pick up the cookie to dump the excess back on to the plate.

Use a food-safe paintbrush to remove any extra sprinkles. (These do get easier to remove as the icing dries... BUT if your cookie's base icing is at all tacky, be sure you remove the extra sprinkles now, or they're not coming off!)
I also recommend NOT doing as shown above. Set the cookie on a clean plate to dust off the extra sprinkles. When you do it this way, the back gets all sprinkly, and you have to dust that off, too, and it's just a pain!

When you do that, sometimes, you might even break off the 'stem,' and that one has to go to the "eat your mistakes" pile. ;-)

To Make the Acorn Cookies:
I said above that I love the acorn cookies best. I think they're the cutest. And they weren't hard.

Start by outlining and flooding the dark brown "cap," and immediately cover with brown sanding sugar (sprinkles).
I found that I could outline and fill about 4 cookies before I needed to sprinkle them, without the icing starting to get a little set and making the sprinkles patchy on top.

Allow that icing to dry for an hour or so... and use a food-safe paintbrush to remove as many extra sprinkles from the bottom half of the cookie as possible.
Then you'll outline and fill the bottom half with lighter brown.

You'll want to let that icing dry for a few hours... just like I described above with the leaf cookies before you add your accents.

Happy Autumnal Equinox! (It's Saturday, in case you're planning a party yourself.)

Click the Links Below to See:
Other Fall Decorating Ideas
Other Cookie Decorating Ideas
Recipes for Cookies and Icings

Enter your email address below to receive the latest recipes, tips and ideas in your email inbox:


Delivered by FeedBurner

And don't forget, if you shop at Amazon.com through my link My Dad called me a few weeks ago and asked if I could make him some special cookies for a Personalized Fall Cookies, you support this blog and its contents. Thank you!
Read More
Back-to-School Apple Cookies

Back-to-School Apple Cookies

My college roommate taught first grade for a few years after we graduated. About a year and a half in, I remember her telling me to never give a teacher any mugs, Christmas ornaments, etc. with an apple on it-- unless it was the teacher's first year. (Because it's apparently all anyone ever gives them.)

Well, I wonder if cookies shaped like apples count, because that's what I plan to give my kids' teachers this year.

What you need:
One batch of Vanilla Sugar Cookies
One batch Royal Icing
  (See below for colors and consistencies)
3-5 Icing bags fitted with tip 3
Apple Cookie Cutter
Optional:
small leaf cookie cutter (for worm)
small fluted or flower cookie cutter (for "bites")


Cut out the cookies. Remember to use a sugar cookie recipe that does not spread in the oven. That's why I like my Vanilla Sugar Cookie Recipe. It spreads very, very little.

To cut the apple with a bite out of it, cut the apple out. Then using the small fluted-edge or small flower cutter, cut a "bite" from either side (or from both, if you want).

To make the worm, use a small leaf cutter, and attach to the apple near the top. (You could also just freehand a worm-like shape if you don't have the leaf cutter.)

Remember to place the trays of cut-outs into the freezer for 15 minutes (no longer than 20 minutes) before baking as this helps keep them from spreading.

While your cookies bake and cool, Color your icing:
3/4 cup Red for apple
1/4 cup Green
1/4 cup Brown for stem
leave 1/4 cup white
(optional: yellow or black for writing)

Load about half of each color into an icing bag bullet and use in a piping bag with tip #3 (You could also use any other round tips  if you don't have multiple tip #3s.)

You need to thin the remaining half of your red, green and brown to a "flood consistency." This means you add water about 1/2-1 tsp. at a time until you drop a drop of icing into the bowl and it "disappears" into the icing in the count of 10. Load that icing into disposable zip-top bags for flooding the cookies.

*Note about royal icing: Royal icing hardens (or sets) very quickly. So, you need to keep all of your bags, tips and bowls of royal icing covered with a damp paper towel at all times. If you do find that the icing won't come out when you squeeze, don't use all of your might to squeeze it out or you could blow out and ruin your bags. Remove the tip and rinse under hot water to get the clog out, or use a toothpick. With the zip-top bags, just use that damp towel to clean off the hole.

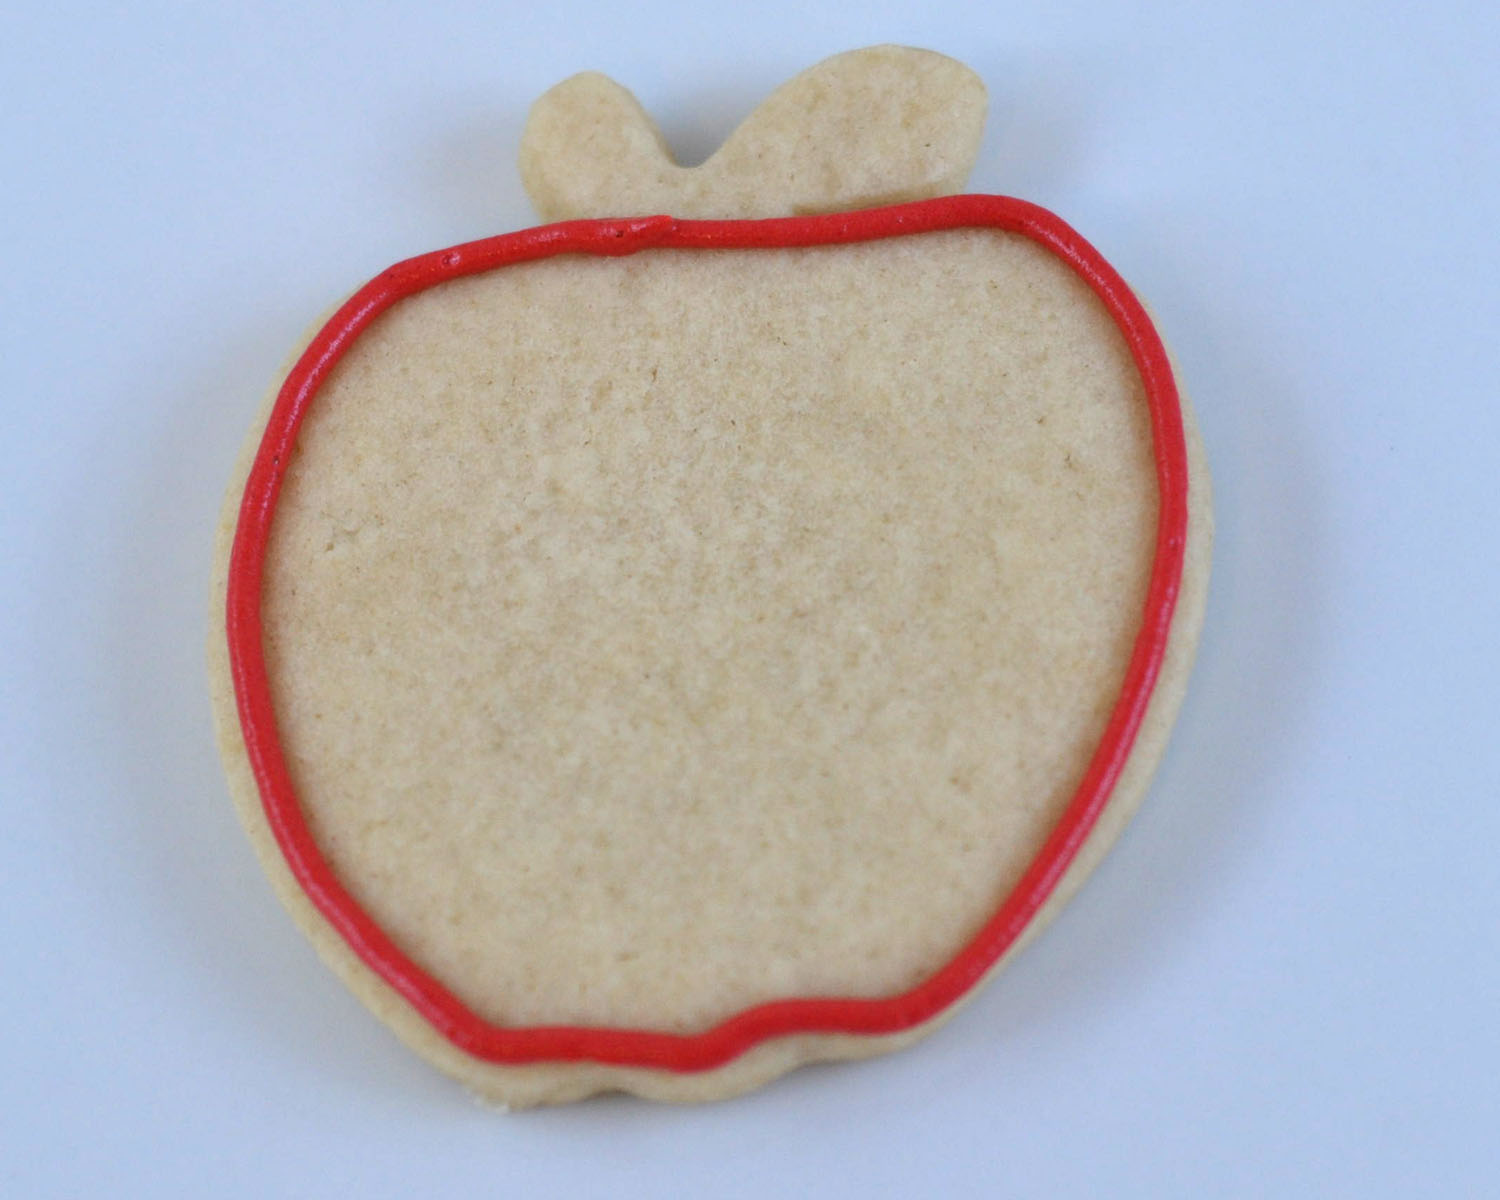
To Decorate the cookies:
Begin by outlining the red of the apple shape. Use your tip #3. Hold your bag at an angle so that the back of the bag is pointing at your chest or at your right shoulder. Let the tip lightly touch the surface all the way around the cookie so that you keep the outline in the perfect shape. If I try to hurry and pull it off of the surface, I find that I get straight lines where I want curves to be.

*Note: Be sure you make the little "dips" for the bottom of the apple, and for where you will add the stem.

For the worm cookies, be sure you leave an indentation where your worm will begin in the apple.

For the cookies with a bite out of them, leave room along the side of the cookie between the red outline and the edge for a white outline of the bite.

Add the white outline to the outside edge of the "bitten" apples.
Add your green outlines (worms and leaves).
*Note: I would have followed with my brown outlines, but I forgot to make the brown at first. Oops! So, I had to go back and add that later.

To flood the cookies, cut a small hole (the diameter of a small grain of rice) in the corner of the bag. While you gently squeeze the bag, keep that hole immersed in the icing, and spread/push the icing around the outline to fill it in. If you need to, use a toothpick to help spread the icing into small crevices.
(Yes, this is a cherry cookie, not an apple. Sorry, I forgot to take a picture of the apple flooding.)

I would start by flooding the red, then do the green and the brown.

If you want to add a little "accent" on the apples, I would do it while the icing is still wet. Use your tip #3 on white icing, and pipe a small backwards comma shape in the top left "hump" of the apple. Adding this while it's wet means the accent will sink into the icing more than stick out on top.

To add the accents on the leaves and the worms, use a tip #2 or 3. Add lines, eyes and a mouth for the worm, and add the veins in the leaves.

If you want to write on the apples, I would wait until the red has had a while to set and dry before adding it. The black may bleed into the red if you don't wait.

Be sure your apples are completely dry before you try to stack or store them.

Welcome Back to School!!!

Click the Links Below to See:
More Back-to-School/ Teacher Ideas
More Fall Decorating Ideas
Other Cookie Decorating Ideas
Vanilla Sugar Cookie Recipe
Royal Icing Recipe

Enter your email address below to receive the latest recipes, tips and ideas in your email inbox:


Delivered by FeedBurner

Read More
Back-to-School Crayon Cookies

Back-to-School Crayon Cookies

These crayon cookies are a lot like the pencil cookies I posted yesterday. You just make an extra cut, and make a couple more colors for them.

What YouNeed:
One recipe Vanilla Sugar Cookies
Ruler
One recipe Royal Icing
Icing colors: yellow, pink, green, blue, black
Tip #3, #1
Piping Bags
Zip-top sandwich bags (or snack-size bags)
Plastic Wrap (for icing bag bullets)
Damp Paper Towel (to keep icing from drying out)


You'll start just like the pencil cookies. Make a batch of the Vanilla Sugar Cookies, and after you roll it out and refrigerate it, cut it into a square. I kept my lines straight by lining up the end of the ruler at the corners, to make a 90-degree angle.

To cut the cookies, I measured the dough to approximately 1 1/2" wide strips and cut it with a pastry cutter. A pizza cutter would also work, or a knife.
I then cut the dough in half horizontally. (Making each pencil about 4 1/2" long.)

To cut the tip of the crayon, you'll want to make a small cut, about 1/8" long, about 1/2" from the end of the cookie. Cut both sides.

Then you'll cut from that mark towards the center. But remember that crayons don't come to a sharp point like a pencil, so you want to make that end point a little wider.


Remember that you want to put the tray of cut-outs into the freezer for 15 minutes before you put it in the oven to bake. That keeps the dough from spreading.
Bake them for about 8-10 minutes in a 350-degree oven. They're done when the tips start to brown.

To Decorate:

You will need about 1/4-1/2 cup each of yellow, pink, green, blue and black.

You want to color the icing at the "stiffer" consistency, then take about half of it out, put it into an icing bag bullet (click the link to see the wonder of the bullet.). This is what you will make your outlines with. Then thin the other half of each color.


To thin the icing, add water about 1/2 to 1 tsp. at a time. Mix the water in until the icing is at a flooding consistency. You will know it's the right consistency when a dollop you drop in disappears in a slow count of 10.

In the photo above, you see the dollop in the middle. This is as I just dropped it in.

This photo shows that dollop when I got to 10. You can see a teeny outline on that picture. That's all you should see at 10.
If you add too much water, you'll need to either add some more of a stiffer consistency icing, or add a little powdered sugar.
Pour this icing into a zip-top sandwich bag. That's what I use to put it on the cookies.

I start decorating the cookies with the black outlines. You'll want to do two rectangles towards each end of the cookies, and an oval near the center.

Add the outlines of the color. (If you're really particular, you may want to make two shades of each color- one lighter for the crayon "wrapper." I'm not that particular.)

Begin filling in the cookies. Try to cut a really, really small hole in the corner of your baggie to do these cookies. There are some really small spots- like between the oval and the rectangles- to fit the icing in. Remember to keep that cut tip in the flood of icing as you work your way around.

Use a toothpick to help spread the flooding icing into some of the smaller spots.

Next, you'll fill in your blacks.

Then add the little swirly shapes to the rectangles.

And if you wish, switch to a tip #1 or 2 to write the names, or a message in your black ovals.

Perfect for preschool!!

Click the Links Below to See:
More Back-to-School and Teacher Ideas
Back-to-School Pencil Cookies
Cookie Decorating Ideas & Recipes
Vanilla Sugar Cookie Recipe
Royal Icing Recipe

Enter your email address below to receive the latest recipes, tips and ideas in your email inbox:


Delivered by FeedBurner
Read More