Showing posts sorted by relevance for query french-silk-pie. Sort by date Show all posts
French Silk Pie

French Silk Pie

Did you know today is "National Pie Day?" Really?! I don't get these "days." But since I had planned to post this recipe later in the week, I decided I'd go ahead and celebrate.

This French Silk Pie recipe is adapted from one I found in an old church cookbook. (Don't all of the best recipes come from an old church cookbook?) This is usually what I make for my husband on his birthday. This year, however, he raised the stakes. His birthday dessert did involve this pie, but not in a traditional way. You'll see what I mean Friday with "The Most Ridiculous Chocolate Cake Ever."
Now, for the pie.

What You Need: (for the crust)
2 cups flour
1 tsp. salt
2 Tbsp. powdered sugar
1/2 cup shortening
1/2 cup heavy cream
3 Tbsp. butter
What You Need: (for the filling)
3/4 cup butter (at room temperature)
1 cup powdered sugar
5 oz. semisweet or unsweetened chocolate, melted*
1 1/2 tsp. vanilla
3 eggs (or 3/4 cup pasteurized egg "product" to protect from salmonella)
For the topping:
1 cup heavy whipping cream
3 Tbsp. powdered sugar
1 tsp. vanilla


Start with the pie crust. A note about this pie crust. This is my "cream pie" pie crust... not to be confused with my "fruit pie" pie crust, which is a little flakier and not as rich. Yes, I realize only a crazy person has two pie crust recipes, but that's long-since been established.

Preheat the oven to 425-degrees.
In the bowl of a mixer, or in a medium-sized bow, combine the dry ingredients.
Add shortening and butter, and either mix on low or cut in with a pastry cutter just until you get coarse crumbs, like you see above.
*If you overmix this, it's not flaky at all. It gets all hard like a store-bought crust. Blech.

Add the cream, with the mixer on low until it just begins to form a ball. There will still be some crumbs. Again, do not overmix or it will get tough.

Turn onto floured waxed or parchment paper.
You can see that it is not uniform. This is the trick to keeping it flaky. Now, using your hands, gently press it, and fold it until it becomes a ball. (This should take no more than 4-5 folds or kneads, or again, you're overmixing it.)
Once it is a ball, divide the dough in half. This recipe makes two crusts for a 9" pie. If you only need one (like for this chocolate pie recipe), wrap the other half of the dough in plastic wrap, stick it in a freezer bag, and put it in the freezer for later use.

Dust the parchment and the dough with flour again, and roll out to about 1/8" thick.
*Note: I am making mini pies in this picture, which I will cut out of a giant piece of dough. If I were making a regular pie, I would have tried harder to make the dough end up in a circle, not the shape of Australia.

Now for the part I always hate, when making a full-size pie. Getting it into the pie plate. I use the parchment kind of like I do when I make fondant... I slip my arm under the paper, and line it up, then flip it into pie plate. When I take it off of the paper, I find that it cracks and breaks too much.

Trim the crust even with the outer edge of the pie plate, and use your fingers and thumb to make the little indentations.
I wish I had that third arm to be able to take a photo while I do it, but I'll try to describe... you press the thumb of your left hand down, towards the pie while you press two fingers of your right hand away from the pie, creating the "waves."

Lay a piece of parchment (not waxed!) paper inside of the crust, and fill it with dried beans. These will weigh the crust down so it doesn't shrink while you bake it.
(This is called "blind baking," I learned that once while playing the game "Battle of the Sexes" with my husband. Neither of us knew the answer. So, just a little trivia for you.)

Bake a full-sized pie at 425 for 30-40 minutes. (Remove the parchment & beans with about 10 minutes left at the end to get the middle/bottom golden brown.) These mini pies only took about 12-15 minutes.
Let the crust cool while you make your filling.

The Filling:
 And important note... EVERYTHING needs to be room temperature for this recipe. The melted chocolate can be slightly warmer, but nothing can be refrigerator cold, or you'll get clumpy filling.
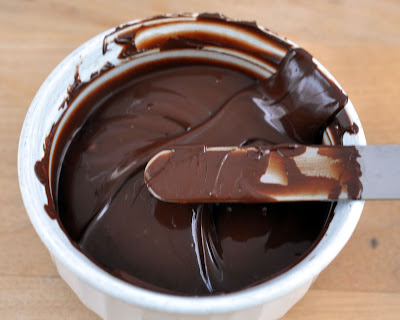
Begin by melting your chocolate. (I use the microwave on power level 3, for about 3 minutes. Stirring after each minute.)

In the bowl of a mixer, combine the butter and powdered sugar until it is creamy. (2-3 minutes)
*The original recipe called for granulated sugar, but I didn't like how it was gritty, so I use powdered. However, I think the powdered sugar does end up making the filling a little more "solid," so use your judgement if you like it a little looser.

Next, add the vanilla and melted chocolate, and mix until well combined.

Add the eggs, one at a time, or the pasteurized eggs 1/4 cup at a time. Mixing for a full minute after each addition until it looks soft, light and silky like this.
This is where you want to be a little careful. Try to use a low speed, and watch that you don't overmix or it can separate a little, which is kind of what happens to mine almost every time because I forget to pay attention. It still tastes awesome.

Spoon the mixture into cooled pie crust(s).

Top with whipped cream and a drizzle of melted chocolate.

To make the whipped cream: 
Combine the cream & powdered sugar in the bowl of a mixer. Mix on high until stiff peaks form (mine took about a minute). Add vanilla just before you turn off the mixer.
To help the cream whip best, put the bowl and beater(s) in the refrigerator for a while before you whip it.

Enjoy!

Click this link if you would like to purchase a one-page printable version of this recipe for $1. The link will take you to PayPal, where you will enter your email address when you pay. I will then email you a .pdf version of the recipe complete with photos and instructions.

Enter your email address below to receive the latest recipes, tips and ideas in your email inbox:


Delivered by FeedBurner

If you shop at Amazon.com through my link But since I had planned to post this recipe later in the week French Silk Pie, you support this blog and its contents. Thank you!
Read More
French Silk Pie

French Silk Pie

Did you know today is "National Pie Day?" Really?! I don't get these "days." But since I had planned to post this recipe later in the week, I decided I'd go ahead and celebrate.

This French Silk Pie recipe is adapted from one I found in an old church cookbook. (Don't all of the best recipes come from an old church cookbook?) This is usually what I make for my husband on his birthday. This year, however, he raised the stakes. His birthday dessert did involve this pie, but not in a traditional way. You'll see what I mean Friday with "The Most Ridiculous Chocolate Cake Ever."
Now, for the pie.

What You Need: (for the crust)
2 cups flour
1 tsp. salt
2 Tbsp. powdered sugar
1/2 cup shortening
1/2 cup heavy cream
3 Tbsp. butter
What You Need: (for the filling)
3/4 cup butter (at room temperature)
1 cup powdered sugar
5 oz. semisweet or unsweetened chocolate, melted*
1 1/2 tsp. vanilla
3 eggs (or 3/4 cup pasteurized egg "product" to protect from salmonella)
For the topping:
1 cup heavy whipping cream
3 Tbsp. powdered sugar
1 tsp. vanilla


Start with the pie crust. A note about this pie crust. This is my "cream pie" pie crust... not to be confused with my "fruit pie" pie crust, which is a little flakier and not as rich. Yes, I realize only a crazy person has two pie crust recipes, but that's long-since been established.

Preheat the oven to 425-degrees.
In the bowl of a mixer, or in a medium-sized bow, combine the dry ingredients.
Add shortening and butter, and either mix on low or cut in with a pastry cutter just until you get coarse crumbs, like you see above.
*If you overmix this, it's not flaky at all. It gets all hard like a store-bought crust. Blech.

Add the cream, with the mixer on low until it just begins to form a ball. There will still be some crumbs. Again, do not overmix or it will get tough.

Turn onto floured waxed or parchment paper.
You can see that it is not uniform. This is the trick to keeping it flaky. Now, using your hands, gently press it, and fold it until it becomes a ball. (This should take no more than 4-5 folds or kneads, or again, you're overmixing it.)
Once it is a ball, divide the dough in half. This recipe makes two crusts for a 9" pie. If you only need one (like for this chocolate pie recipe), wrap the other half of the dough in plastic wrap, stick it in a freezer bag, and put it in the freezer for later use.

Dust the parchment and the dough with flour again, and roll out to about 1/8" thick.
*Note: I am making mini pies in this picture, which I will cut out of a giant piece of dough. If I were making a regular pie, I would have tried harder to make the dough end up in a circle, not the shape of Australia.

Now for the part I always hate, when making a full-size pie. Getting it into the pie plate. I use the parchment kind of like I do when I make fondant... I slip my arm under the paper, and line it up, then flip it into pie plate. When I take it off of the paper, I find that it cracks and breaks too much.

Trim the crust even with the outer edge of the pie plate, and use your fingers and thumb to make the little indentations.
I wish I had that third arm to be able to take a photo while I do it, but I'll try to describe... you press the thumb of your left hand down, towards the pie while you press two fingers of your right hand away from the pie, creating the "waves."

Lay a piece of parchment (not waxed!) paper inside of the crust, and fill it with dried beans. These will weigh the crust down so it doesn't shrink while you bake it.
(This is called "blind baking," I learned that once while playing the game "Battle of the Sexes" with my husband. Neither of us knew the answer. So, just a little trivia for you.)

Bake a full-sized pie at 425 for 30-40 minutes. (Remove the parchment & beans with about 10 minutes left at the end to get the middle/bottom golden brown.) These mini pies only took about 12-15 minutes.
Let the crust cool while you make your filling.

The Filling:
 And important note... EVERYTHING needs to be room temperature for this recipe. The melted chocolate can be slightly warmer, but nothing can be refrigerator cold, or you'll get clumpy filling.

Begin by melting your chocolate. (I use the microwave on power level 3, for about 3 minutes. Stirring after each minute.)

In the bowl of a mixer, combine the butter and powdered sugar until it is creamy. (2-3 minutes)
*The original recipe called for granulated sugar, but I didn't like how it was gritty, so I use powdered. However, I think the powdered sugar does end up making the filling a little more "solid," so use your judgement if you like it a little looser.

Next, add the vanilla and melted chocolate, and mix until well combined.

Add the eggs, one at a time, or the pasteurized eggs 1/4 cup at a time. Mixing for a full minute after each addition until it looks soft, light and silky like this.
This is where you want to be a little careful. Try to use a low speed, and watch that you don't overmix or it can separate a little, which is kind of what happens to mine almost every time because I forget to pay attention. It still tastes awesome.

Spoon the mixture into cooled pie crust(s).

Top with whipped cream and a drizzle of melted chocolate.

To make the whipped cream: 
Combine the cream & powdered sugar in the bowl of a mixer. Mix on high until stiff peaks form (mine took about a minute). Add vanilla just before you turn off the mixer.
To help the cream whip best, put the bowl and beater(s) in the refrigerator for a while before you whip it.

Enjoy!

Click this link if you would like to purchase a one-page printable version of this recipe for $1. The link will take you to PayPal, where you will enter your email address when you pay. I will then email you a .pdf version of the recipe complete with photos and instructions.

Enter your email address below to receive the latest recipes, tips and ideas in your email inbox:


Delivered by FeedBurner

If you shop at Amazon.com through my link But since I had planned to post this recipe later in the week French Silk Pie, you support this blog and its contents. Thank you!
Read More
The Most Ridiculous Chocolate Cake Ever

The Most Ridiculous Chocolate Cake Ever

I've mentioned before that my husband loves chocolate. So, we were discussing his usual birthday chocolate pie the other day, and with the input of the two 5-year-olds, we ended up deciding that he didn't want just a chocolate pie this year. No. He wanted a chocolate cake and French Silk pie combo. If I weren't writing this blog, there is no way he'd have EVER gotten away with this request.

So, here it is: The most ridiculous chocolate cake ever! (Don't let the candles throw you, that is 6"x8" of pure chocolate, butter, sugar goodness.)

What You Need:
One recipe Rich Chocolate Cake
One recipe French Silk Pie (including crust and whipped cream)
One recipe Chocolate Ganache

Just so you're prepared, we're talking about 1 pound (and then some) of chocolate, 6 eggs, about 1 pound of butter, 2 cups of heavy whipping cream, and a dozen or so other ingredients.


The Baking and The Making:

Begin by baking three 6" round cakes. (You can see the recipe and tutorial here.)

While the cakes cool (or the next day), make the parts from the French Silk Pie.

For the pie crust, I chose to roll the dough out and use a small heart-shaped cutter to make pieces to attach to the outside of the cake. I would recommend using a cutter that is 1" or smaller because of the curve of the cake. If they're too big, they're hard to get to stick to the cake without cracking and crumbling.

I also recommend using a fork to make small holes in the dough to help keep the crust cut-outs from puffing up too much in the oven. The ones that got puffy were very challenging to handle or press into the cake without crumbling.

The crust cut-outs bake at 425 for just 6-8 minutes on a parchment-lined cookie sheet. They cool quickly as well. I used about 1/2 of the dough from my crust recipe for enough cut-outs to cover a 6"x8" round cake. (Along with a few for breakage and a few for snacking.)

For the filling, you will need about 1 1/4 cups of the chocolate pie filling (which should leave you with some leftover for more snacking).

The final two parts to prepare are the chocolate ganache icing and the whipped cream, but I would wait to whip the cream until you are ready to present the cake.

For the ganache, (the chocolate that covers the outside of the cake), you will need about 8 oz. of cream and 8 oz. of chocolate.

I heat my cream in the microwave for a minute or two, until it just starts to boil. Then take it out, add the chocolate, and let it sit for about a minute before whisking it together. I wanted the ganache to be a little stiffer for this cake than I usually would because I knew I was going to be covering it with crust and whipped cream, so it didn't have to be perfectly smooth. And if it's a little thicker (cooler), it's easier to spread on the cake, and makes less of a mess. So, I put my ganache into the refrigerator while I assembled the cake-- stirring it every so often so that it didn't get too thick. (It took about 20 minutes or so in the fridge to get it thick enough for me.)

The Assembling and The Decorating:

Start by leveling and torting each of your cakes (cut them in half). You want the top of the cake to be flat, and each layer of cake will be about 1" thick. You will end up with six layers of cake and five layers of filling. (Yum!)

Place your bottom layer on your serving plate, cut-side up.

Spread about 1/4 cup of the pie filling around the cake, as evenly as possible.
I think the hardest thing about spreading filling, particularly a filling this thick, is to make sure you don't have a mound in the middle, and thin on the edges. You don't want that or you could wind up with a wobbly 8" tall cake, and that could end badly.

Repeat this four more times. Cake-filling-cake-filling-cake-filling-cake-filling-cake-filling...

...ending with your last layer of cake, bottom's up. (Remember that it's always easier to spread icing on the part of the cake that was in the bottom of the pan, than to spread it on the part that baked on top.)
You might also notice the parchment paper slips around the bottom of the cake. This is how I prepare the cake to spread the ganache on it. It helps keep your plate cleaner.

Now for the ganache. You want it to be thick (cool) enough that it won't drip all the way down the side of the cake while you're spreading it, but not so thick that it doesn't spread easily.
Pour about 1/4 of the ganache on top of the cake and spread it so that it starts to fall over the side.

It should stop dripping before it gets halfway down the cake, kind of like in the photo above. If the chocolate drips down all 7 or so inches, it's still too warm, and it needs to cool a little further.
To spread the ganache around the sides, smooth the large drips that come from the top. I find the sides are easiest when I add chocolate to the top, push it over the edge, let it drip down, and smooth it. Just be sure you don't end up with an inch-thick layer on the top.

This is what your 6"x8" tower of chocolate will look like.

The decorating is actually rather simple. Using gentle pressure, press the crust cut-outs into the side of the cake. I cracked and crumbled my first few until I got the hang of what would work and what wouldn't.

Whew! We're almost there, people.

Finally, you'll want to whip the cream. (Put the bowl and the beater(s) in the fridge for about 30 minutes before you do this, and it whips up easier.) For my whipping cream, I like to use about 1 cup of whipping cream plus 2-3 Tbsp. of powdered sugar. Whip it on high speed until stiff peaks form. If you want, you can also add 1 tsp. of vanilla just before you turn off the mixer.

Load that into a piping bag fit with a large star tip like Wilton's #1M, and make stars all over the top of the cake by holding the bag straight up from the surface, squeeze, and pull straight up.
You can also drizzle some of the leftover ganache (I had about 1 Tbsp. leftover, just enough for a drizzle) over the top of the cake. I spooned the chocolate into a sandwich bag and cut a small hole in the corner to make the drizzle. (I had to heat it in my hands a little to make it more melty to drizzle.)

And that, my friends, is the most ridiculous chocolate cake, ever.

Be sure you keep the cake in the refrigerator because of the filling. (Check that you have a space tall enough in the fridge. I should probably share the picture I took of it tucked inside my fridge... but I won't.)

Total time in preparation is probably in the 5-hour range. I guess this guy is worth it, though.
Check out those candles! 5" tall gold candles. I love them. Expect to see those again some time! Thank you, Party City!

So, would you ever make this cake? Even for your love?
Also, what is the most ridiculous cake/treat you've ever made? (I have to say this must be mine.)

Enter your email address below to receive the latest recipes, tips and ideas in your email inbox:


Delivered by FeedBurner

Remember, if you shop at Amazon.com through my link we were discussing his usual birthday chocolate pie the other day The Most Ridiculous Chocolate Cake Ever, you support this blog and its contents. Thank you!
Read More