Showing posts with label What Does That Do. Show all posts
The Proof is in the Photos - Bake Even Strips

The Proof is in the Photos - Bake Even Strips

A few weeks ago, I posted about using Wilton's Bake Even Strips, and how they work so well that I never even bother to bake without them... not even to take a comparison shot.
Well, I decided I should do it, even if I didn't want to. So, I took advantage of the fact that I was baking a cake for cake pops, so it didn't matter if it domed, and I baked one with the strip and one without.

Here's the photo comparison:

 I baked two cakes in 9" round pans. SAME cake mix. I even measured 2 1/4 cups into each pan so that they would be completely even. I wrapped the cake on the right with the strip, didn't wrap the one on the left.


Out of the oven, you can see how the one on the right baked more evenly and flat than the one on the left.


And check this out! Look at the difference in the color and "crust" on the sides of the cakes!! That cake on the right is going to be a lot easier to make into cake pops, because it won't have the annoying crusty sides. And it will also be easier to ice and decorate without extra crumbs.
Neither of these cakes ended up with a big dome, but the one baked with the strip is still a little flatter than the other.

*Note: I'm not paid by anyone here. I'm just sharing what works for me. (Though I do teach Wilton Cake Decorating Classes.)
Read More
Pan Goop - Copycat 'Cake Release'

Pan Goop - Copycat 'Cake Release'

This is the best, easiest, quickest, cheapest gift for the baker in your life.
It's called "pan goop." I found it on Wilton's Cake Release, and I needed something to grease my cake pans with.

This stuff is a-maz-ing! It works perfectly, and it's SO easy and cheap to make.

What You Need:
1 cup shortening
1 cup vegetable oil
1 cup flour


Ready for how easy this is?

Combine oil, shortening and flour in a medium-sized mixing bowl. Mix with hand mixer on medium speed until smooth and creamy.

To keep it for yourself, simply spoon it into a large, airtight container, and store at room temperature.
To gift it, spoon it into small jars, leaving some space at the top, because the oil will separate a little, and can make a mess. (I learned this the hard way.)

To use, brush a thin layer on the bottoms and sides of your pans. You'll never have to grease and flour again, and your cakes won't stick to the pan!

Click the Links Below to See:
Never Grease and Flour Your Pans
Cake Decorating 101 - How to Ice a Cake
Basic Cake Decorating Ideas

Enter your email address below to receive the latest recipes, tips and ideas in your email inbox:


Delivered by FeedBurner
Read More
What Does THAT Do?! -- Cake Leveler

What Does THAT Do?! -- Cake Leveler

If you follow this blog, you've seen me use it a zillion times...
My Cake Leveler which you can buy at your local craft store or cake supply store What Does THAT Do?! -- Cake Leveler

This $5-6 gadget, which you can buy at your local craft store or cake supply store, is awesome, and worth every penny.

You use a cake leveler to level off the dome on the top of the cake - as seen in the pumpkin cake photo above.

Or to add layers to cakes/tortes as seen in this vanilla-chocolate cake.

Do you have an idea for "What Does THAT Do?!" Send me a photo or a description, and I'll try to find out for you.

Click the Links Below to See:
Other What Does That Do?! Posts

Get the latest ideas from .  
Click Here to Sign Up on the Email List.
Read More
What does THAT do?! - Bismarck Tip

What does THAT do?! - Bismarck Tip


The Bismarck Tip, (Wilton's #230), is a fabulous tip. This is what you use to fill cupcakes—or Bismarck doughnuts, if you’re so inclined. And once you’ve made filled cupcakes, you just can’t go back to plain, boring cupcakes again!
Wilton’s Bismarck tip does not fit on a coupler, which can be kind of a bummer because if your cupcakes are dense, it can push the tip back up inside the bag and make a big mess. Ateco’s Bismarcktip says it fits on a standard coupler. (I’ve never tried it.)

How to use it:
Using a disposable pastry bag and a thin filling (pudding is perfect), insert the Bismarck tip about halfway into your cupcake. Squeeze.
It will take you a few tries to figure out just how much filling is getting in there. So, you’ll just have to split a few in half, and eat the rejects. (Bonus!)

*Tip: Hold the cupcake in your hand when filling it. You can feel the bottom of the cupcake start to “puff” when you’ve got enough filling in there.
Do you have an idea for “What does THAT do?!” Send me an email with a description or a photo, and I’ll do my best to explain it for you.

Click the Links Below to See:
More "What Does That Do?!"
Cupcake Recipes and Ideas 
How to Make a Cupcake Icing Swirl

Enter your email address below to receive the latest recipes, tips and ideas in your email inbox:


Delivered by FeedBurner

Read More
The Icing Bag Bullet

The Icing Bag Bullet

Revolutionize your icing bag clean-up with icing bag "bullets." I only recently started using these... after more than a decade of decorating, and I am In Love!

What You Need
Icing (any kind)
Piping bag (disposable or reusable)
Plastic wrap
Scissors
Coupler


Lay a sheet of plastic wrap about the size of a legal-size piece of paper on your countertop. Place a spatula or two of icing on the sheet. I try to make it more "log" shaped because, in the end, that's what you want, so it's easier to start with the right shape.

Wrap the plastic around the icing. Pull the top (of the more narrow side) down, and wrap the bottom up.

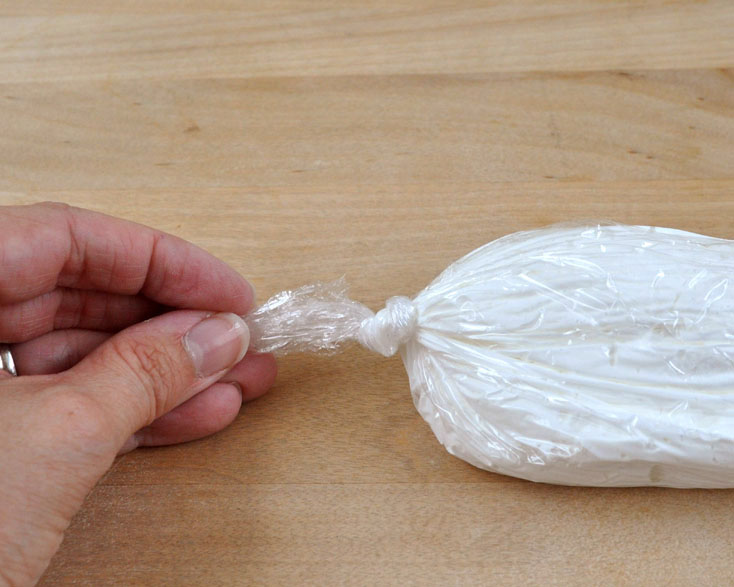
Grab the ends of the plastic wrap and "swing it" around in little circles in front of you to make the wrap tighten. (I couldn't take a picture during because I don't have a third hand, but this is what the icing bag bullet will look like after you tighten up the ends.)

Then I tie each end. I tie one end close to the icing. This will be the "back" end that remains in the bag.


The other end, I tie closer to the end of the plastic wrap. This will be fed through the coupler.

I will often load up my icing bullets ahead of time, and put these in the refrigerator just like this in a large baggie until I need to use them.

To put the icing bullet in the bag, insert the coupler into the bag. Then turn the bag inside out to as close as the coupler as possible.
 

Thread the long end of the plastic wrap through the coupler. The plastic wrapped icing bullet sticks to the inside of the disposable bags, that's why I turn the bag inside out as much as possible.

Turn the bag so that the icing bullet is inside the bag. (I often end up holding it up by the plastic wrap through the coupler, and turning the bag back with the other hand.)

When you're ready to use the bag, cut the plastic wrap as close to the coupler as possible. Put the icing tip on, screw on the coupler ring, and you're ready to decorate!
To Remove the Icing Bag Bullet, and "clean up:"
To remove the icing bullet from the bag, grab on to that back knot, and pull.

You can toss the icing bullet out, or if there's lots of icing left, like in this one, I'll squeeze it into a new bullet to save it for later.


Now, check this out! See that speck of icing?? That little bit down there in the coupler?? That's ALL you have to clean! That's it! See that bag? See how clean it is?? Awesome!

In all fairness, yes, occasionally the icing bullets blow out and do messy the bag, but honestly, this only happens to me when I'm teaching a kids' workshop, and they don't use the decorating bags properly. But even so, that mess is even better-contained than a regular blow-out or icing coming out the back of the bag.

I hope you love icing bag bullets as much as I do. Because I really, really do!

Click the Links Below to See:

Enter your email address below to receive the latest recipes, tips and ideas in your email inbox:


Delivered by FeedBurner
Read More
What Does THAT Do?! - Cake Release

What Does THAT Do?! - Cake Release

Does your cake stick to the pan? Here's the answer... You may have seen the little bottle of "Cake Release" on the shelves with the other cake decorating supplies, and wondered "What Does That Do?!" Well, it keeps cakes from sticking. It really, really keeps cakes from sticking to the pan.

All you do, is squirt some in the bottom of your pan...

Then use a pastry brush to cover the bottom and sides of the pan.

If you use the cake release... then place the cake pan on a cooling rack/grid straight from the oven (never on the counter top)... wait 10 minutes... then flip the cake out of the pan... your cakes will almost never stick.

Do you have an idea for "What Does THAT Do?!" Email me a photo or description.

Click the Links Below to See:
More What Does That Do?! Ideas 
More Basic Cake Decorating Tricks and Techniques 

Get the latest ideas from .  
Click Here to Sign Up on the Email List.
Read More
What Does THAT Do?! - Bake-Even Strips

What Does THAT Do?! - Bake-Even Strips

You know how your cake comes out of the oven with that annoying dome in the middle? You know how to ice your cake and make it look all smooth and stuff you have to level off that dome? You know how it sucks to lose that much height on your cake, and you're left with a squatty-looking cake? Problem solved!

Let me introduce you to Bake Even Strips. They're from Wilton, and I have used them for years. These save you a lot of time and a lot of cake!

Here's how they work: You soak the strips in ice water for 15 minutes (or so) to get them cold and wet. You then wrap them around the outside of the cake pan and use the pin to keep them tight.
(Note: I got these a dozen years ago, that's why they look so... loved. The newer ones don't have this little extra flap of fabric, so you just pin it right through the other end.)

Occasionally, you may need to add an extra few minutes to bake your cake, but they keep it nice and level. Why? Because they keep the outside of the pan cool. See, your cake domes in the middle because the outside cooks faster than the inside.

I always remove the strips from the pan as soon as I take the cake out of the oven-- to allow the sides to cool better.
Don't mind that this cake is kind of lumpy. It's a chocolate-covered cherry cake, so it's supposed to look like that.

And this is what the cake looks like when baked with the Bake Even Strip.


Click the link for the photos comparing cake baked with and without the Bake Even Strips.

Do you have an idea for "What Does THAT Do?!" Send me a photo or a description, and I'll try to find out for you.

Click the Links Below to See:
More What Does That Do?! Ideas
Other Basic Cake Decorating Tips & Tricks

Get the latest ideas from .  
Click Here to Sign Up on the Email List.
Read More
The Proof is in the Photos - Bake Even Strips

The Proof is in the Photos - Bake Even Strips

A few weeks ago, I posted about using Wilton's Bake Even Strips, and how they work so well that I never even bother to bake without them... not even to take a comparison shot.
Well, I decided I should do it, even if I didn't want to. So, I took advantage of the fact that I was baking a cake for cake pops, so it didn't matter if it domed, and I baked one with the strip and one without.

Here's the photo comparison:

 I baked two cakes in 9" round pans. SAME cake mix. I even measured 2 1/4 cups into each pan so that they would be completely even. I wrapped the cake on the right with the strip, didn't wrap the one on the left.


Out of the oven, you can see how the one on the right baked more evenly and flat than the one on the left.


And check this out! Look at the difference in the color and "crust" on the sides of the cakes!! That cake on the right is going to be a lot easier to make into cake pops, because it won't have the annoying crusty sides. And it will also be easier to ice and decorate without extra crumbs.
Neither of these cakes ended up with a big dome, but the one baked with the strip is still a little flatter than the other.

*Note: I'm not paid by anyone here. I'm just sharing what works for me. (Though I do teach Wilton Cake Decorating Classes.)
Read More